1. http://mobiforge.com/developing/story/using-google-maps-android
2. http://codebybrian.com/2012/12/06/google_maps_android_v2_sample.html
3. http://mirnauman.wordpress.com/2012/01/30/using-google-maps-in-android-development-tutorial-part-1/
4. http://www.edumobile.org/android/android-beginner-tutorials/mapmarkerexample/
5. http://mobile.tutsplus.com/tutorials/android/android-sdk-working-with-google-maps-application-setup/
6. http://androiddevelopement.blogspot.com/2011/06/android-google-map-application-example.html
7. http://eagle.phys.utk.edu/guidry/android/mapOverlayDemo.html
8. http://www.androidhive.info/2012/01/android-working-with-google-maps/
9. http://www.chupamobile.com/tutorial/details/53/Integrating+Google+Maps+in+Android+App/
10. http://www.vogella.com/articles/AndroidGoogleMaps/article.html
11. https://blog-emildesign.rhcloud.com/?p=435
Hiển thị các bài đăng có nhãn Android. Hiển thị tất cả bài đăng
Hiển thị các bài đăng có nhãn Android. Hiển thị tất cả bài đăng
Thứ Bảy, 4 tháng 5, 2013
Thứ Tư, 24 tháng 4, 2013
Android Activity Lifecycle – Android Key Concepts
Trong bài viết này, Chúng ta sẽ tìm hiểu vòng đời của "Android Activity" và các sự kiện khác nhau được xử lý kết hợp với từng giai đoạn thay đổi. Nếu bạn chưa biết gì về Activity trong Android, go to Android application components first.
Chúng tôi biết làm thế nào để một ứng dụng hoạt động trong nền tảng desktop(desktop platform) như
Windows, Linux hoặc Mac. Sau khi bắt đầu một chương trình, chúng ta có thể giảm thiểu hoặc khôi phục nó bất cứ khi nào chúng ta muốn và the software will preserve its state (trừ khi hệ thống treo - unless the system crashes). Tình hình là hoàn toàn khác trong Android và chúng ta có quyền kiểm soát it hơn trong Android. Do đó như một nhà phát triển, chúng ta cần một kiến thức toàn diện về vòng đời "Android Activity" trước khi bắt đầu phát triển.
Một Activity trong Android có thể tồn tại trong 4 trạng thái được mô tả như sau :
1. Active/Running state
Đây là trạng thái khi mà một activity đang xuất hiện trên màn hình và người dùng có thể nhìn thấy, tương tác với nó.
2. Paused state
Trong trạng thái dừng lại, activity hiển thị một phần với người dùng nhưng không hoạt động và mất tập trung vào nó. This occurs when some another Activity is on top of this one which doesnot cover the entire screen or having some transparancy so that the underlying Activity is partially visible. A paused activity is completely alive and maintains its state but it can be killed by system under low memory when memory can be freed by no other ways.
3. Stopped state
This is when the Activity is no longer visible in the screen. Another activity is on top of it and completely obscures its view. In this state also the activity is alive and preserves its state, but more likely to be killed by the system to free resources whenever necessary
4. Destroyed/Dead state
An Activity is said to be dead or destroyed when it no longer exists in the memory. Either the Activity hasn’t been started yet or once it was started and killed by the system in Paused or Stopped state to free resources.
The gray rectangular boxes shows the callback methods that are called prior to the state changes.
The above Android Activity Lifecycle flow diagram can be explained as follows:
They are:
Stay tuned to Android-App-Market.com for all future updates
Add your comments and feedback below:
Chúng tôi biết làm thế nào để một ứng dụng hoạt động trong nền tảng desktop(desktop platform) như
Windows, Linux hoặc Mac. Sau khi bắt đầu một chương trình, chúng ta có thể giảm thiểu hoặc khôi phục nó bất cứ khi nào chúng ta muốn và the software will preserve its state (trừ khi hệ thống treo - unless the system crashes). Tình hình là hoàn toàn khác trong Android và chúng ta có quyền kiểm soát it hơn trong Android. Do đó như một nhà phát triển, chúng ta cần một kiến thức toàn diện về vòng đời "Android Activity" trước khi bắt đầu phát triển.
Một Activity trong Android có thể tồn tại trong 4 trạng thái được mô tả như sau :
1. Active/Running state
Đây là trạng thái khi mà một activity đang xuất hiện trên màn hình và người dùng có thể nhìn thấy, tương tác với nó.
2. Paused state
Trong trạng thái dừng lại, activity hiển thị một phần với người dùng nhưng không hoạt động và mất tập trung vào nó. This occurs when some another Activity is on top of this one which doesnot cover the entire screen or having some transparancy so that the underlying Activity is partially visible. A paused activity is completely alive and maintains its state but it can be killed by system under low memory when memory can be freed by no other ways.
3. Stopped state
This is when the Activity is no longer visible in the screen. Another activity is on top of it and completely obscures its view. In this state also the activity is alive and preserves its state, but more likely to be killed by the system to free resources whenever necessary
4. Destroyed/Dead state
An Activity is said to be dead or destroyed when it no longer exists in the memory. Either the Activity hasn’t been started yet or once it was started and killed by the system in Paused or Stopped state to free resources.
The Android Activity Lifecycle Diagram
The figure below shows the Android Activity Lifecycle flow chart. Its very important for a developer, have a close study.The gray rectangular boxes shows the callback methods that are called prior to the state changes.
The above Android Activity Lifecycle flow diagram can be explained as follows:
- When we launch an Activity in Android, it first calls the onCreate() method. This is where we do User Interface creation and initialization of data elements. This method is provided with a Bundle object as parameter to restore the UI state.
- onStart() method is called before the Activity is being visible to the User. Remember that Activity is still not Active.
- With the onResume() method, the Activity become visible and Active for the user to interact with. The Activity will be at the top of the Activity stack at this point. Now the Activity is in running /active state and is able to receive user inputs.
- In the Active state, onPause() method will be called when the system is about to resume another Activity on top of this one or when the user is about to navigate to some other other parts of the system. It is the last guaranteed call to a method before the Activity can get killed by the system. That is, there’s a possibility that your activity may be killed by the system at the paused state without executing any further method calls. Therefore it is important to save the user interface configuration and critical data at this method.
- By default, an Activity can remain in the paused state if:
- The user has pressed the home button
- Another activity or notification which is on top of it doesn’t completely obscures the visibility of underlying Activity.
- The device goes to sleep.
- There are three possibilities for an Activity under paused state:
In all other cases it goes to stopped state by executing onStop() method. This is the default action when the user has pressed the back button, or a new activity which completely covers it resumes on top.
- The user resumes the Activity by closing the new Activity or notification and the paused Activity gets Active/Running by calling onResume() method.
- It gets killed by the system under extremely low memory conditions. In this case there will be no further method calls before the destruction of the Activity and it needs to be re-run from the beginning by calling onCreate() and restoring the previous configuration from bundle object.
- An Activity under stopped state also has three different scenarios to happen:
- System kills it to free resources. An activity under stopped sate is more likely to be killed by the system than one in the paused state. It needs to start the cycle again with onCreate().
- It get restarted by calling onRestart() , onStart() and onResume() methods in the order if the user navigates back to the Activity again. In this case, the User Interface is intact and no need to be restored.
- onDestroy() method is called and the Activity is destroyed. This is the final method we can call before the Activity is destroyed. This occurs either because the Activity is finishing the operation or the system is temporarily destroying it to save space..
Android Activity Lifecycle Loops
By analyzing the Android Activity lifecycle diagram we can see there are three lifecycle loops exist for every Activity and are defined by those callback methods.They are:
Entire Lifetime: This is the lifetime between the first call to the onCreate() and the final call to onDestroy() method. We create all global resources such as screen layout, global variables etc in onCreate() and release all resources with onDestroy() call.
Visible Lifetime: It is the lifetime of an Activity between onStart() and onStop()
method calls. In this the Activity is visible to the user and he may or
may not be able to interact with it. During the visible lifetime, an
Activity maintains its state intact.
Foreground Lifetime:
Foreground lifetime starts with onResume() and ends with onPause()
method calls. During this, the Activity is completely visible to the
user and is on top of all other Activities so that user can interact
with it.
Add your comments and feedback below:
Thứ Tư, 17 tháng 4, 2013
Data Storage in Android
Android cung cấp một số tùy chọn để bạn có thể lưu dữ liệu ứng dụng liên
tục. Các giải pháp bạn chọn
phụ thuộc vào nhu cầu cụ thể của bạn, chẳng hạn như dữ liệu cần private
hoặc được truy cập từ các ứng dụng khác (public) và cần bao nhiêu không gian cho dữ
liệu của bạn.
Tùy chọn lưu trữ dữ liệu của bạn như sau:
Shared Preferences
Lưu trữ dữ liệu cá nhân nguyên thủy trong cặp key-value.
Internal Storage
Lưu trữ dữ liệu cá nhân trên bộ nhớ điện thoại.
External Storage
Lưu trữ dữ liệu public trên chia sẻ lưu trữ bên ngoài (SDCard).
SQLite Databases
Lưu trữ dữ liệu có cấu trúc trong một private database.
Network Connection
Lưu trữ dữ liệu trên các trang web với máy chủ mạng riêng của bạn.
Android cung cấp một cách để lộ dữ liệu cá nhân của bạn cho các ứng dụng khác với Content Provider.
Tùy chọn lưu trữ dữ liệu của bạn như sau:
Shared Preferences
Lưu trữ dữ liệu cá nhân nguyên thủy trong cặp key-value.
Internal Storage
Lưu trữ dữ liệu cá nhân trên bộ nhớ điện thoại.
External Storage
Lưu trữ dữ liệu public trên chia sẻ lưu trữ bên ngoài (SDCard).
SQLite Databases
Lưu trữ dữ liệu có cấu trúc trong một private database.
Network Connection
Lưu trữ dữ liệu trên các trang web với máy chủ mạng riêng của bạn.
Android cung cấp một cách để lộ dữ liệu cá nhân của bạn cho các ứng dụng khác với Content Provider.
1. Shared Preferenxes
Lớp SharedPreferences cung cấp
một khuôn khổ chung cho phép bạn lưu trữ và lấy cặp
giá trị key-value. Bạn có thể sử dụng SharedPreferences
để lưu bất kỳ
dữ liệu nguyên thủy nào như: booleans, float, ints, longs, và
strings. Dữ liệu này sẽ tồn tại thông qua user
sessions (ngay
cả khi ứng dụng của bạn bị tắt đi).
Để có được một đối tượng SharedPreferences cho các ứng dụng của bạn, hãy sử dụng một trong
hai phương pháp:
getSharedPreferences () - Sử dụng nó nếu bạn cần nhiều tập tin preferences được xác định theo tên, mà bạn chỉ định với tham số đầu tiên.
getPreferences () - Sử dụng điều này nếu bạn chỉ cần một tập tin preferences cho your activity. Vì c ó duy nhất một tập tin preferences cho your activity, bạn không c â ần cung cấp một cái tên.
Để viết các giá trị:
Gọi edit() để có được một SharedPreferences.Editor.
Thêm giá trị với các phương pháp như putBoolean () và putString ().
Cam kết giá trị mới với commit()
Để đọc các giá trị, sử dụng phương thức SharedPreferences như getBoolean () và getString ().
getSharedPreferences () - Sử dụng nó nếu bạn cần nhiều tập tin preferences được xác định theo tên, mà bạn chỉ định với tham số đầu tiên.
getPreferences () - Sử dụng điều này nếu bạn chỉ cần một tập tin preferences cho your activity. Vì c ó duy nhất một tập tin preferences cho your activity, bạn không c â ần cung cấp một cái tên.
Để viết các giá trị:
Gọi edit() để có được một SharedPreferences.Editor.
Thêm giá trị với các phương pháp như putBoolean () và putString ().
Cam kết giá trị mới với commit()
Để đọc các giá trị, sử dụng phương thức SharedPreferences như getBoolean () và getString ().
public class SharedPrefsActivity
extends Activity {
public
static final String
PREFS_NAME = "MyApp_Settings";
@Override
public
void onCreate(Bundle
savedInstanceState) {
super.onCreate(savedInstanceState);
setContentView(R.layout.main);
SharedPreferences
settings = getSharedPreferences(PREFS_NAME, MODE_PRIVATE);
// Writing data to
SharedPreferences
Editor editor = settings.edit();
editor.putString("key",
"some value");
editor.commit();
// Reading from
SharedPreferences
String value =
settings.getString("key", "");
Log.d(TAG, value);
}
2. Internal Storage
Bạn có thể lưu các tập tin trực tiếp vào bộ nhớ trong của thiết bị. Theo mặc định, các tập tin được lưu vào không gian trong ứng dụng của bạn và các ứng dụng khác không thể truy cập chúng. Khi người sử dụng tháo
gỡ ứng dụng của bạn, những tập tin này được gỡ bỏ.
Để tạo và viết một tập tin để lưu trữ nội bộ:
Gọi openFileOutput () với tên của tập tin và operating mode.Nó trả về một FileOutputStream.
Viết đến file call write().
Đóng dòng với close ().
Để tạo và viết một tập tin để lưu trữ nội bộ:
Gọi openFileOutput () với tên của tập tin và operating mode.Nó trả về một FileOutputStream.
Viết đến file call write().
Đóng dòng với close ().
String
FILENAME = "hello_file";
String
string = "hello world!";
FileOutputStream
fos = openFileOutput(FILENAME, Context.MODE_PRIVATE);
fos.write(string.getBytes());
fos.close();
MODE_PRIVATE sẽ tạo ra các tập tin
(hoặc thay thế một tập tin cùng tên)
và make it private to your
application. Các
chế độ khác có sẵn
là: MODE_APPEND, MODE_WORLD_READABLE,
và MODE_WORLD_WRITEABLE.
Để đọc một tập tin từ internal storage:
Gọi openFileInput().Nó trả về một FileInputStream.
Đọc bytes từ các tập tin với read().
Sau đó, đóng dòng với close ().
Để đọc một tập tin từ internal storage:
Gọi openFileInput().Nó trả về một FileInputStream.
Đọc bytes từ các tập tin với read().
Sau đó, đóng dòng với close ().
Saving cache files
Nếu bạn muốn để cache một số dữ liệu,
chứ không phải lưu trữ nó liên tục,
bạn nên sử dụng getCacheDir () để mở File đại diện
cho các thư mục bên trong ứng dụng của bạn nên
lưu các tập tin bộ nhớ cache tạm thời.
Khi điện thoại được thấp trên không gian lưu trữ nội bộ, Android có thể xóa các tập tin bộ nhớ cache để khôi phục không gian. Tuy nhiên, bạn không nên dựa trên hệ thống để làm sạch các tập tin cho bạn. Bạn nên luôn luôn duy trì các tập tin bộ nhớ cache chính mình và ở lại trong một giới hạn hợp lý tiêu thụ không gian, chẳng hạn như 1MB. Khi người sử dụng tháo gỡ ứng dụng của bạn, những tập tin này được gỡ bỏ.
Khi điện thoại được thấp trên không gian lưu trữ nội bộ, Android có thể xóa các tập tin bộ nhớ cache để khôi phục không gian. Tuy nhiên, bạn không nên dựa trên hệ thống để làm sạch các tập tin cho bạn. Bạn nên luôn luôn duy trì các tập tin bộ nhớ cache chính mình và ở lại trong một giới hạn hợp lý tiêu thụ không gian, chẳng hạn như 1MB. Khi người sử dụng tháo gỡ ứng dụng của bạn, những tập tin này được gỡ bỏ.
Other useful methods
getFilesDir ()
Nhận được đường dẫn tuyệt đối đến thư mục hệ thống tập tin nơi các tập tin nội bộ của bạn được lưu.
getDir ()
Tạo (hoặc mở) thư mục hiện có trong không gian lưu trữ nội bộ của bạn.
deleteFile ()
Xóa một tập tin lưu trên lưu trữ nội bộ.
filelist ()
Trả về một mảng các file được lưu bởi ứng dụng của bạn.
Nhận được đường dẫn tuyệt đối đến thư mục hệ thống tập tin nơi các tập tin nội bộ của bạn được lưu.
getDir ()
Tạo (hoặc mở) thư mục hiện có trong không gian lưu trữ nội bộ của bạn.
deleteFile ()
Xóa một tập tin lưu trên lưu trữ nội bộ.
filelist ()
Trả về một mảng các file được lưu bởi ứng dụng của bạn.
Example :
File mediaDir = new File("media");

if (!mediaDir.exists()){

   mediaDir.createNewFile();

   mediaDir.mkdir();
}

File f = new File(getLocalPath());

f.createNewFile();

FileOutputStream fos = new FileOutputStream(f);

fos.write(data);

fos.close();
getLocalPath()à returns /data/data/myPackage/files/media/qmhUZU.jpg<uses-permission android:name="android.permission.WRITE_INTERNAL_STORAGE" />
3.
External Storage
Mỗi thiết bị tương thích với hệ điều hành Android hỗ trợ lưu trữ bên
ngoài mà bạn có thể sử dụng để lưu các tập tin. Điều này
có thể là một
phương tiện truyền
thông lưu trữ di động (như một thẻ SD) hoặc
lưu trữ nội bộ (không thể tháo rời). Các tập tin được lưu vào lưu trữ bên ngoài là có thể đọc được và
có thể được sửa đổi bởi người sử dụng khi họ
cho phép lưu trữ USB để chuyển các tập tin trên một máy tính.
Checking media availability
Trước khi bạn làm
bất kỳ công việc với việc lưu trữ
bên ngoài, bạn
nên luôn luôn gọi getExternalStorageState () để kiểm tra xem các phương tiện truyền thông
có sẵn. Các
phương tiện truyền thông có thể
được gắn với một máy tính, missing, read-only, or in some other state. Ví dụ, đây là cách bạn có thể tự kiểm tra:
boolean mExternalStorageAvailable = false;
boolean mExternalStorageWriteable = false;
String state = Environment.getExternalStorageState();
if (Environment.MEDIA_MOUNTED.equals(state)) {
// We can read and write the media
mExternalStorageAvailable = mExternalStorageWriteable = true;
} else if (Environment.MEDIA_MOUNTED_READ_ONLY.equals(state)) {
// We can only read the media
mExternalStorageAvailable = true;
mExternalStorageWriteable = false;
} else {
// Something else is wrong. It may be one of many other states, but all we need
// to know is we can neither read nor write
mExternalStorageAvailable = mExternalStorageWriteable = false;
}
èVí dụ này kiểm tra xem
lưu trữ bên ngoài là có sẵn để đọc và viết. GetExternalStorageState
() phương thức trả về mà bạn
có thể muốn để kiểm tra, chẳng hạn
như việc các phương tiện truyền thông đang được chia sẻ (kết nối với máy tính), missing, đã được gỡ bỏ xấu, vv Bạn có thể
sử dụng các thông báo cho người sử dụng với thêm thông tin khi ứng
dụng của bạn cần phải truy cập
vào các phương tiện truyền thông.
Accessing files on external storage
Nếu bạn đang sử dụng API Level 8 hoặc cao hơn, sử
dụng getExternalFilesDir () để mở File đại diện
cho thư mục lưu trữ bên ngoài nơi bạn nên lưu
các tập tin của bạn. Phương pháp này có
một tham số kiểu quy định cụ thể các loại của thư mục
con bạn muốn, chẳng hạn như
DIRECTORY_MUSIC và DIRECTORY_RINGTONES.
Phương pháp này
sẽ tạo ra các thư mục thích hợp nếu cần thiết. Bằng cách xác định các loại thư mục, bạn đảm bảo rằng máy quét phương tiện truyền thông của Android đúng cách sẽ
phân loại các tập
tin của bạn trong hệ thống (ví dụ, nhạc chuông được xác định là nhạc chuông và not music). Nếu người sử dụng tháo gỡ
ứng dụng của bạn, thư mục này và tất cả các nội dung của nó sẽ bị xóa.
Nếu bạn đang sử dụng API Level 7 hoặc thấp hơn, sử dụng getExternalStorageDirectory (), để mở một tập tin đại diện cho các thư mục gốc của các lưu trữ bên ngoài. Sau đó, bạn nên ghi dữ liệu của bạn trong thư mục sau:
/ Android / data / <package_name> / files /
<package_name> Là tên gói Java-style của bạn, chẳng hạn như "com.example.android.app". Nếu thiết bị của người dùng đang chạy API Level 8 hoặc cao hơn và họ gỡ bỏ cài đặt ứng dụng của bạn, thư mục này và tất cả các nội dung của nó sẽ bị xóa.
Nếu bạn đang sử dụng API Level 7 hoặc thấp hơn, sử dụng getExternalStorageDirectory (), để mở một tập tin đại diện cho các thư mục gốc của các lưu trữ bên ngoài. Sau đó, bạn nên ghi dữ liệu của bạn trong thư mục sau:
/ Android / data / <package_name> / files /
<package_name> Là tên gói Java-style của bạn, chẳng hạn như "com.example.android.app". Nếu thiết bị của người dùng đang chạy API Level 8 hoặc cao hơn và họ gỡ bỏ cài đặt ứng dụng của bạn, thư mục này và tất cả các nội dung của nó sẽ bị xóa.
Saving files that should be shared
Nếu bạn muốn lưu các tập tin không cụ thể cho ứng dụng của bạn và không
xóa khi ứng dụng của bạn được gỡ bỏ, lưu chúng vào một thư mục nào trên lưu trữ bên
ngoài. Những thư mục này nằm ở thư mục gốc
của các lưu trữ bên ngoài, chẳng hạn như /
Music, Pictures / Ringtones
/ và others.
Trong API Level 8 hoặc cao hơn, sử dụng getExternalStoragePublicDirectory () with type same as DIRECTORY_MUSIC, DIRECTORY_PICTURES, DIRECTORY_RINGTONES, hoặc others. Phương pháp này sẽ tạo ra các thư mục thích hợp nếu cần thiết.
Nếu bạn đang sử dụng API Level 7 hoặc thấp hơn, sử dụng getExternalStorageDirectory () để mở File đại diện cho thư mục gốc của các lưu trữ bên ngoài, sau đó lưu các tập tin chia sẻ của bạn trong một trong các thư mục sau đây:
Music / -
Podcast / -
Trong API Level 8 hoặc cao hơn, sử dụng getExternalStoragePublicDirectory () with type same as DIRECTORY_MUSIC, DIRECTORY_PICTURES, DIRECTORY_RINGTONES, hoặc others. Phương pháp này sẽ tạo ra các thư mục thích hợp nếu cần thiết.
Nếu bạn đang sử dụng API Level 7 hoặc thấp hơn, sử dụng getExternalStorageDirectory () để mở File đại diện cho thư mục gốc của các lưu trữ bên ngoài, sau đó lưu các tập tin chia sẻ của bạn trong một trong các thư mục sau đây:
Music / -
Podcast / -
Ringtones
/ - nhạc chuông.
Alarms / - âm thanh báo động.
Notifications / - âm thanh thông báo.
Pictures / - Tất cả hình ảnh.
Movies / - Tất cả các phim.
Download /
Alarms / - âm thanh báo động.
Notifications / - âm thanh thông báo.
Pictures / - Tất cả hình ảnh.
Movies / - Tất cả các phim.
Download /
Saving cache files
Nếu bạn đang sử dụng API Level 8 hoặc cao hơn, sử
dụng getExternalCacheDir () để mở File đại diện
cho thư mục lưu trữ bên ngoài nơi bạn nên lưu
các tập tin bộ nhớ cache. Nếu
các người dùng gỡ
bỏ ứng dụng của bạn, những file
này sẽ được tự động xóa. Tuy nhiên, trong ứng dụng của bạn, bạn nên quản lý những tập tin bộ nhớ cache và loại bỏ
những người không cần thiết để bảo
tồn không gian tập tin.
Nếu bạn đang sử dụng API Level 7 hoặc thấp hơn, sử dụng getExternalStorageDirectory () để mở một tập tin đại diện cho thư mục gốc của các lưu trữ bên ngoài, sau đó viết dữ liệu bộ nhớ cache của bạn trong thư mục sau:
/ Android / data / <package_name> / cache /
<package_name> Là tên gói Java-style của bạn, chẳng hạn như "com.example.android.app".
Nếu bạn đang sử dụng API Level 7 hoặc thấp hơn, sử dụng getExternalStorageDirectory () để mở một tập tin đại diện cho thư mục gốc của các lưu trữ bên ngoài, sau đó viết dữ liệu bộ nhớ cache của bạn trong thư mục sau:
/ Android / data / <package_name> / cache /
<package_name> Là tên gói Java-style của bạn, chẳng hạn như "com.example.android.app".
5. Network Connection
Refers to storing data on the cloud.
HTTP or FTP file and content transfers through the java.net.* packages makes
this happen.
(dùng để lưu trữ dữ liệu trên đám mây. Tập tin HTTP hoặc FTP và chuyển
nội dung thông qua các gói java.net.*)
không phải là thực sự là một
kỹ thuật lưu trữ
dữ liệu, nhưng có thể là một cách dữ liệu bền
bỉ cho một người dùng cụ thể,
cung cấp thiết bị
được kết nối với internet, bằng cách
sử dụng một số loại
xác thực. Bạn phải cân bằng giữa việc tải dữ liệu
mỗi khi ứng dụng cần
nó, hoặc có một thời gian đồng bộ dữ liệu,
mà cuối cùng sẽ dẫn đến một trong các tùy chọn lưu
trữ đã đề cập ở trên.
Examples
You can also use Internet to store your data. Here's an example code how can you upload your file(s) to you remote web server:
You can also use Internet to store your data. Here's an example code how can you upload your file(s) to you remote web server:
HttpRequest request = new HttpRequest(“http://host/some_path”);
Part[] parts = { new StringPart(param_name,value), new
FilePart(f.getName(), f) };
filePost.setEntity( new MultipartRequestEntity(parts,
filePost.getParams()) );
HttpClient client = new HttpClient();
int status = client.executeMethod(filePost);
Thứ Sáu, 5 tháng 4, 2013
Android - KeyStore (My fingerprint) and register apk
Show my fingerprint :
There are two type of certificate fingerprint, debug and release.
To display debug certificate fingerprint in Linus, simple open Terminal and type the command:
keytool -list -v -keystore ~/.android/debug.keystore -alias androiddebugkey -storepass android -keypass android
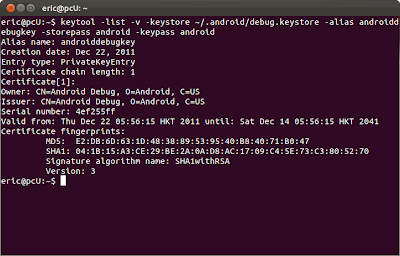
To display release certificate fingerprint, you need to create the release keystore and and sign the .APK once.
- Right click your project and select Android Tools -> Export Signed Application Package...

- Accept the selected project and click Next.

- Select Create new keystore, browse to select Location and enter Password, and click Next.

- Enter Alias, Password, Validity and at least one Certificate issue field, and click Next.

- Select destination APK, and click Finish.

After created the release keystore and and signed the .APK. you can display the release certificate fingerprint.
- open Terminal and type the command:
keytool -list -v -keystore <your_keystore_name> -alias <your_alias_name>
where:
<your_keystore_name> is the path and name of the keystore, including the .keystore extension.
<your_alias_name> is alias that you assigned to the certificate when you created it.

If you get error of "keytool error: java.lang.Exception: Keystore file does not exist", read HERE.
keytool -list -alias androiddebugkey -keystore c:\Users\YOURUSER\.android\debug.keystore -storepass android -keypass android Displaying the SHA1 certificate fingerprint
To display debug certificate fingerprint in Linus, simple open Terminal and type the command:
keytool -list -v -keystore ~/.android/debug.keystore -alias androiddebugkey -storepass android -keypass android

To display release certificate fingerprint, you need to create the release keystore and and sign the .APK once.
- Right click your project and select Android Tools -> Export Signed Application Package...

- Accept the selected project and click Next.

- Select Create new keystore, browse to select Location and enter Password, and click Next.

- Enter Alias, Password, Validity and at least one Certificate issue field, and click Next.

- Select destination APK, and click Finish.

After created the release keystore and and signed the .APK. you can display the release certificate fingerprint.
- open Terminal and type the command:
keytool -list -v -keystore <your_keystore_name> -alias <your_alias_name>
where:
<your_keystore_name> is the path and name of the keystore, including the .keystore extension.
<your_alias_name> is alias that you assigned to the certificate when you created it.

If you get error of "keytool error: java.lang.Exception: Keystore file does not exist", read HERE.
Thứ Hai, 28 tháng 1, 2013
catch event rotation in android
var supportsOrientationChange = "onorientationchange" in window;
var orientationEvent = supportsOrientationChange ? "orientationchange" : "resize";

window.onload = updateOrientation();

window.addEventListener(orientationEvent, function() {
    updateOrientation();
}, false);

function updateOrientation(){
    switch(window.orientation){
    case 0:
    alert(window.outerHeight); // Returns '356' with browser chrome
    break;

    case -90:
    alert('Landscape right');
    break;

    case 90:
    alert(window.outerHeight); // Returns '208' w browser chrome
    break;

    case 180:
    //alert('Portrait view - upside down');
    break;
    }
    var orientation = (window.orientation);
}
Đăng ký:
Bài đăng (Atom)
-
IMindMap 8.0.4 iMindMap là công cụ tuyệt vời để vẽ bản đồ tư duy đem mọi chi tiết trong đầu bạn ra thành các ý tươgnr, để nắm bắt ý tư...
-
1. Download Bamboo in : http://www.atlassian.com/software/bamboo/download?os=linux cd ~ mkdir BAMBOO cd BAMBOO wget http://www.atlassia...
-
1.Giới thiệu về Vim Vim – Vi iMprove là bản cải thiện của Vim – một trình soạn thảo phổ biến trên Unix. Vim có tính cấu hình rất cao ...


